Total Pageviews

11/23/2011

How To : Publish Asp.Net website in local machine


In this tutorial I will explain how to publish website in local machine.First you will need to check IIS is installed on your local machine or not.Now open your application in visual studio we need to publish on local machine.
  •     Open the website goto “menu”, select “Build” and click on “Publish Web Site”.  


 Now open one wizard in that it will put target location i.e., the place to save the published application (ex: Create one folder on desktop or any other location give that path by using browse button beside of that textbox).


  • Now click on “OK” publish it all the files into target location.
  • Now go to the location folder copy that folder and put it in wwwroot folder(path of that folder is C:\Inetpub\wwwroot)


  • Now open the Run in Start Menu or keyboard shortcut (Window Key + R) and type inetmgr and Click Enter it will redirect to IIS


  • Open the Sites after that open the Default web site in that you will find your published website because you have already placed in wwwroot folder.


  •  Click on right side of your website it will display all of your published pages select whatever the page first you need to run right click on that and click browse it will display your published website.


Now your website is published on your local computer.


11/16/2011

SQL Server : Copy table from one database to another database


Come across situation where I need to copy table from database “db2 “to database “db1”  with data, for that a very handy & useful query given below :-

Example:

             SELECT * INTO db1.dbo.table1
             FROM db2.dbo.table2

Please mind that this query only copies table schema and data only.

All constraints, indexes, statatics, you need to use alternatives


A next generation digital books by - Mike Matas


I enjoyed this TED Video of Mike Matas discussion regarding a next generation digital book for the iPad. Importance 4 minutes of your life if your interested in that sort of thing. Looks like from the end of the video the company Mike is working for (Push Pop Press) are developing an SDK to make it easier produce very media rich content.

11/10/2011

Database BackUp and Restore Script

For .Net developer a very common task is to take reguler backup and restore of SQL Server Database. Most of the time developer does that thru UI of Sql Server Management Studio. It is acully nice to know the Scripts which we can run and take backup and restore easily.


       To BackUp :-        
     BACKUP DATABASE [DatabaseName] TO DISK = 'C:\FileName.bak' WITH FORMAT
       To Restore :-
           RESTORE DATABASE [DatabaseName] FROM DISK = 'C:\FileName.bak'


Also when ever you do any database opration thru UI of Sql Server Management Studio you can always have look to the Script behind that opration. Its good practise to look at the script run by Sql Server to do any database realted opration.

11/08/2011

How to insert multiple records with single insert query


Today itself I encounter a situation where I need to insert multiple data rows with single SQL query.

    USE [Demo]
         GO
    --Create Demo Table—
       
    CREATE TABLE DemoTable(Data VARCHAR(50))       

    --The way we used to—

    INSERT INTO DemoTable(Data)
        VALUES ('DATA 1');
    INSERT INTO DemoTable(Data)
        VALUES ('DATA 2');
    INSERT INTO DemoTable(Data)
        VALUES ('DATA 3');
    INSERT INTO DemoTable(Data)
        VALUES ('DATA 4');
       
       
Solution 1:

    CREATE TABLE DemoTable(Data VARCHAR(50))       


    INSERT INTO DemoTable(data)
        VALUES ('DATA 1'),('DATA 2'),('DATA 3'),('DATA 4');


Solution 2:

    CREATE TABLE DemoTable(Data VARCHAR(50))       

    INSERT INTO DemoTable(data)
    SELECT 'DATA 1'
    UNION ALL
    SELECT 'DATA 2'
    UNION ALL
    SELECT 'DATA 3'
    UNION ALL
    SELECT 'DATA 4'

10/29/2011

How to use RDLC with Asp.net?

How to use RDLC with Asp.net?
Sql server reporting service without instilling SSRS

I just passed thru a situation where my client does require 2 reports to be developed in SSRS ( SQL Server Reporting Service ). It was not good advise to spend extra money behind SSRS on shared hosting as his requirement was very small. I show some example of RDLC (Report Definition Language Client-side) to my client and he was very excited about that.

I thought it’s nice to share this with all my blog readers and my friends.

Introduction
Step : 1 Create a Parameterized Store Procedure.
(I have used table called ProjectDetail for this tutorial )

    CREATE PROCEDURE [dbo].[ReportProjectDetail]
    (
      @ProjectID  INT=NULL ,
      @FromDate   DATE=NULL,
      @ToDate     DATE=NULL
    )
    AS
    BEGIN
    SET NOCOUNT ON;
    BEGIN TRY
           SELECT      ProjectID,
                       ProjectName,
                       ClientName,
                       ProjectReqDate,
                       ProjectValue,
                       PartnerID,
                       PartnerType,
                       PartnerName,
                       PartnerEmail,
                       FundingID,
                       FundingStatus,
                       AmountRequested,
                       AmountRecieved,
                       SentFundTo,
          FROM   ProjectDetail                            
          WHERE (@ProjectID =NULL or ProjectID=@ProjectID)
          AND   (@FromDate IS NULL OR CreatedOn BETWEEN @FromDate AND                        @ToDate)

     END TRY                                              
      BEGIN CATCH                                    
          PRINT Error_Message()              
          DECLARE @msg VARCHAR(MAX)
          SELECT @msg = ERROR_MESSAGE()
          EXECUTE ERR_LogError
          RAISERROR('Error in %s: %s', 16, 1, 'ReportProjectDetail',@msg)
      END CATCH                                            
     END


Step : 2 Create a DataSet using the DataSet Designer
  • Start by running Visual Studio and select New Website from the Start page.
  • Add ASP.Net folder App_Code
  • In Solution Explorer Right Click on App_Code > Add new Item > DataSet
  • Now select DataSet & Give name. e.g. ds_ProjectDetail.xsd and Save.
  • Now Right Click anywhere in DataSet sceen and select Add from the context menu.
  • Select Table Adapter In to Wizard. Now create data table.
  • Now choose Existing Store procedures.


Step : 3 Create a report  definition


  •  In Soultion Explorer right click on & select > Add New Item > Reporting > Report 
  • Now Given report name e.g. rptProjectDetail.rdlc Click Add to your project.
  • Now Drag a table from the report designer screen.
  • Now Dataset Properties has to be come in pop up now give your dataset name next choose your dataset next select available reports & last click OK.
  • The table has in three Bands, first header, second detail, & last footer bands. 
  • After created your dataset, it will appear on your left panel in Website Data Source window.
  • Expand it and drag the file to the report designer page . For example, drag and place it in the Table Fields.
  • After you have assigned the attribute, now  report creation is done.


    Step : 4 Add Report Viewer control into your ASPX page

      Step:-

    • In Solution Explore Right click > Add new item >Web > Web Form  now give name e.g. rdlcDemo.aspx and click on Add.
    • Now Open your Left Side Toolbox and drag the Report Viewer control to your ASPX page (In Design mode).
    • Once your have Drop n drag Control on aspx Webpage , select it and click on the arrow on the top right corner to choose your rdlcReport.rdlc report in dropdown list.
    • Don’t Forget to add namespace Microsoft.Reporting.WebForms to be in your code-behind file.


    using System;
    using System.Configuration;
    using System.Data;
    using System.Data.Common;
    using System.Web.UI;
    using Microsoft.Practices.EnterpriseLibrary.Data;
    using Microsoft.Practices.EnterpriseLibrary.Data.Sql;
    using Microsoft.Reporting.WebForms;
    using System.Collections.Generic;
    using System.Linq;
    using System.Web.UI.WebControls;
    using System.Data;
    using DataAccessLayer;

    protected void GenerateReportButton_Click(object sender, EventArgs e)
        {
            ReportViewer1.Visible = true;
            string connectionString = ConfigurationManager.ConnectionStrings
    ["ConnectionStringName"].ConnectionString;

            Database db = new SqlDatabase(connectionString);
            DbCommand command = db.GetStoredProcCommand("ReportProjectDetail");
            db.AddInParameter(command, "@ProjectID", DbType.String, ddlProject.SelectedValue);
            if (calFromDate.Text.ToString() != "")
            {
                db.AddInParameter(command, "@FromDate", DbType.String, calFromDate.Text.ToString());
            }
            if (calToDate.Text.ToString() != "")
            {
                db.AddInParameter(command, "@ToDate", DbType.String, calToDate.Text.ToString());
            }
            DataSet dataset = db.ExecuteDataSet(command);
            ReportDataSource datasource = new ReportDataSource("DataSet1", dataset.Tables[0]);

            ReportViewer1.LocalReport.DataSources.Clear();
            ReportViewer1.LocalReport.DataSources.Add(datasource);

            ReportViewer1.LocalReport.Refresh();

        }
    }

    Bind and Run The Report

    Now  Press F5 to Run the .aspx page.
     
    Thanks,
    Bhavik 


10/22/2011

Free Icons,Images and Animations with Visual Studio 2010

As Developer many times we are looking for good icons and images to use in our application. Microsoft Visual Studio gives lots of icons and images free with its bundle.

One can find ImageLibrary.Zip file in

 "C:\Program Files (x86)\Microsoft Visual Studio 10.0\Common7\VS2010ImageLibrary\1033"

unzip the file and use whatever you want to.

Thanks,
Bhavik

10/21/2011

How to implement MVC (MVC3) model view architecture


In this tutorial one can learn the basics of building an ASP.NET MVC3 Web application using Microsoft Visual Studio, which is a free version of Microsoft Visual Studio.
Before you start, make sure you have the following things installed using the Web Platform Installer.

Visual Studio Web Developer Express with SQL Express
ASP.NET MVC 3
SQL Management Studio

A Visual Web Developer project with C# source code is available to accompany this topic. Download the C# version here. If you prefer Visual Basic,you can apply all these steps using Visual Basic as you Templates.

You'll Learn In this tutorial :-

How to implement a new ASP.NET MVC project solution.
How to implement ASP.NET MVC controllers and views.
How to implement a create new database using the Entity Framework code-first paradigm.
How to retrieve and display data.
How to edit data and enable data validation. 


Getting Started

Start by running Visual Studion 2010 Ultimate and select New Project from the Start page.

  
Create Your First Application in ASP.NET MVC3 Web Application


In the New ASP.NET MVC 3 Project dialog box, select Internet Application. Leave Razor as the default view engine or you select ASPX View.

 
Now Click OK. Visual Studio Used Default templete for the ASP.NET MVC project which you created. Now you are working on this application.


Create The Model For The MVCStudent Application

  • Go To  Solution Explorer > App_Data >  Add > Existing Item explorer to locate the Student.mdf file. Select it and click Add.
  • Now Go To Solution Explorer > Models > Add > New Item Now Select ADO.Net  Entity Data Model.
  • Change the name of the model to Model1.edmx and click Add. 

 
  • In the Choose Model Contents window, select Generate from database and then click the Next button. 
  • On the Choose Your Data Connection page, select Student.mdf in the data connection drop down and click Next.
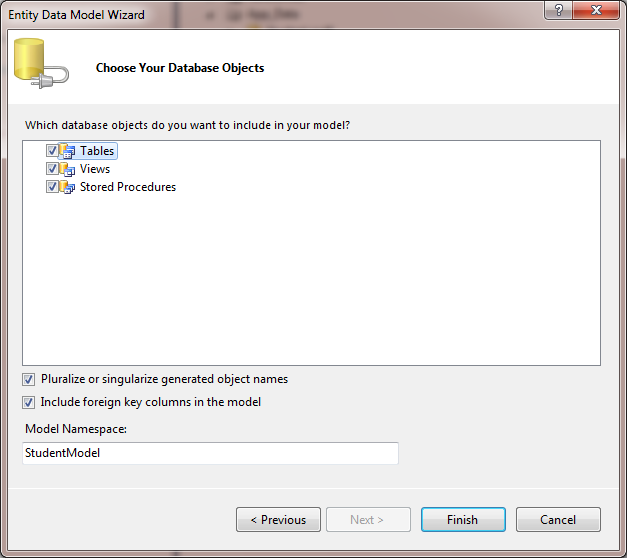
  • Check the Tables checkbox in Choose Your Database Objects (shown in Figure 3) and click Finish.
Visual Studio will open the Entity Data Model designer with the new model,

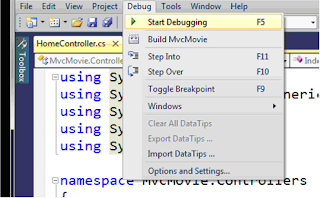
From the Debug menu, select Start Debugging.


On Keyboard Shortcut Press F5 to Start Debugging.


In default template on right side gives you two pages and login page. Now close your browser and start some coding.


Adding a Controller

In First Step is to creat controller class. In Solution Explorer > Controllers > Add > Controller
Now name your new controller and click Add.


Notice in Solution Explorer that a new file has been created named StudentController.cs.
Now Creating Index View to Display the Student List
Right click anywhere in the Index method declaration (public ActionResult Index()).
In the context menu that opens click the Add View option.


The AddView dialog will open with the View name already set to Index.

Check the Create a strongly typed view checkbox.

Drop down the Model class option and select Blog.

From the Scaffold template options select List.

These selections will force Visual Studio to create a new web page with markup to display a list of Blogs. The markup for this web page will use the new MVC Razor syntax. Figure 12 shows the Add View dialog.

Click Add to complete the view creation.


Running the Application

            When you first created the MVC application with the template defaults, Visual Studio created a global.asax file that has in it an instruction, called a routing, that tells the application to start with the Index view of the Home controller. You’ll need to change that to start with the Index View of the Blog controller instead.

Open the global.asax file from Solution Explorer.

            
             Modify the MapRoute call to change the value of controller from “Home” to “Student”.

Now Run The Application 


Now run your application  and see you can create, edit, detail, 


Twitter Delicious Facebook Digg Stumbleupon Favorites More

 
Design by Free WordPress Themes | Bloggerized by Lasantha - Premium Blogger Themes | Affiliate Network Reviews